
 PremiumIT PRO8 min read
Cowork: setting up the billing policy and Cost Management
Before launching Cowork, IT has to set up a billing policy: without it, nothing runs. Let's see where it lives (Cost Management), how an Azure subscription works, the difference between PAYGO and Capacity Packs, and above all how to activate the policy and set monthly and per-user limits to keep the budget under control.
✅ How to
- 1The mandatory starting point
Before you even launch Cowork, there's a box IT has to tick: the billing policy. Without it, nothing runs. The Microsoft Copilot license opens the door, but it's the billing policy that switches on the meter and actually authorizes consumption.
Good news: you set it up once, and you keep control over it at all times. Let's walk through it, step by step.
- 2Where it lives: Cost Management
The exact path, signed in with a Global administrator or Billing administrator role: Microsoft 365 admin center›Copilot›Cost management. Don't confuse it with the older classic « Pay-as-you-go » node (Billing menu), which handles Copilot Chat, SharePoint agents and the Retrieval API. Cowork and Work IQ API are managed under Copilot›Cost management.
A banner at the top of the page reminds you of this. Click the « Get started » button (marker 1 on the screenshot) to open the setup wizard.
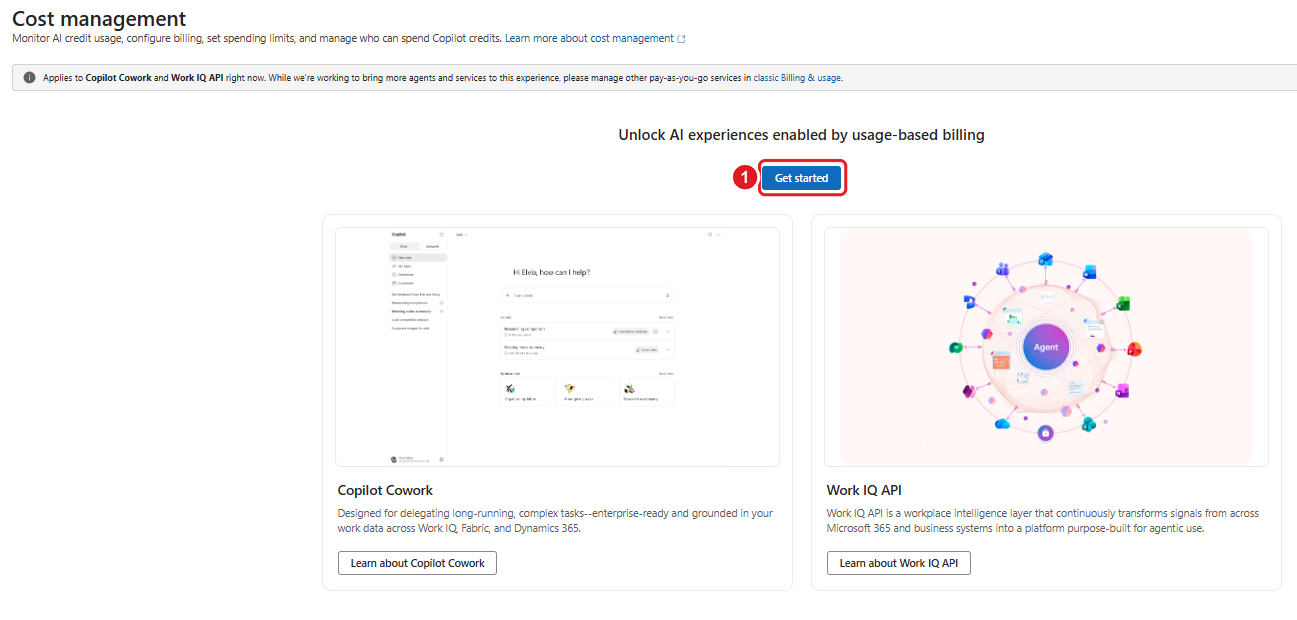
Path: Copilot > Cost management. Click « Get started » (marker 1) to start the setup.
- 3The single currency: Copilot Credits
Everything is measured in one unit: the Copilot Credit. It's the common currency across all usage-based services. Cowork consumes credits based on the work actually done: the model used, the volume of context, tool calls and orchestration.
The key takeaway: you don't reason in euros per task, but in credits consumed. So you steer the budget in credits, with a cap you set yourself.
- 4The Azure subscription: the billing rail
Behind the credits, you need a payment method. That's the role of the Azure subscription: think of it as the account that receives the bill, tied to an organization billing account.
Three scenarios:
- You already have an Azure subscription: it shows up in the dropdown, you pick it (hover to see its ID).
- You don't have one: the system can create one automatically from the billing account (Global administrator role required).
- You have an Azure consumption commitment (MACC): you can use it, as long as you pick the subscription tied to the right billing account.
- 5Two ways to pay: PAYGO and Capacity Pack
Once the subscription is in place, you have two main billing methods:
- Pay-as-you-go (PAYGO): you pay for actual consumption, month after month, via the Azure subscription. It's the recommended choice to start, with no commitment.
- Capacity Packs: a bundle of prepaid credits. They're consumed first, and as soon as they run out, billing automatically switches to PAYGO. Which is why it's worth keeping PAYGO enabled as a safety net.
There are also annual pre-purchase plans (P3): prepaid credits at a discounted rate that layer on top of PAYGO. The table below sums up the three options.
Method How it works Best for PAYGO (usage-based) You pay for actual consumption, month by month, via an Azure subscription Starting a pilot, staying flexible with no commitment Capacity Pack Prepaid credits consumed first, switches to PAYGO once exhausted A volume known in advance, a framed budget Pre-purchase P3 Discounted annual prepaid credits, layered on top of PAYGO Recurring, predictable usage, optimizing cost - 6Activate the default spending policy
The panel « Activate the default spending policy for your organization » opens. This is the action that truly unlocks Cowork. Fill in the four blocks, in the order of the markers on the screenshot:
- Marker 1, Billing method: tick the billing method (« Use Capacity Packs » and/or « Use a pay-as-you-go subscription », the latter being recommended).
- Marker 2, Set the monthly spending limit for this policy: choose « Don't limit monthly spending » or « Limit monthly spending », then enter the maximum number of credits per month.
- Marker 3, Select the monthly spending limit for users: turn on the toggle at the top right, then fill in the « Maximum credit limit users can spend per month » field.
- Marker 4, Define alerts: turn on the toggle, then set the email recipients and the alert threshold.
Finally, click « Activate » (marker 5). Need to target specific groups first? Use « Customize setup configuration », right next to the button.
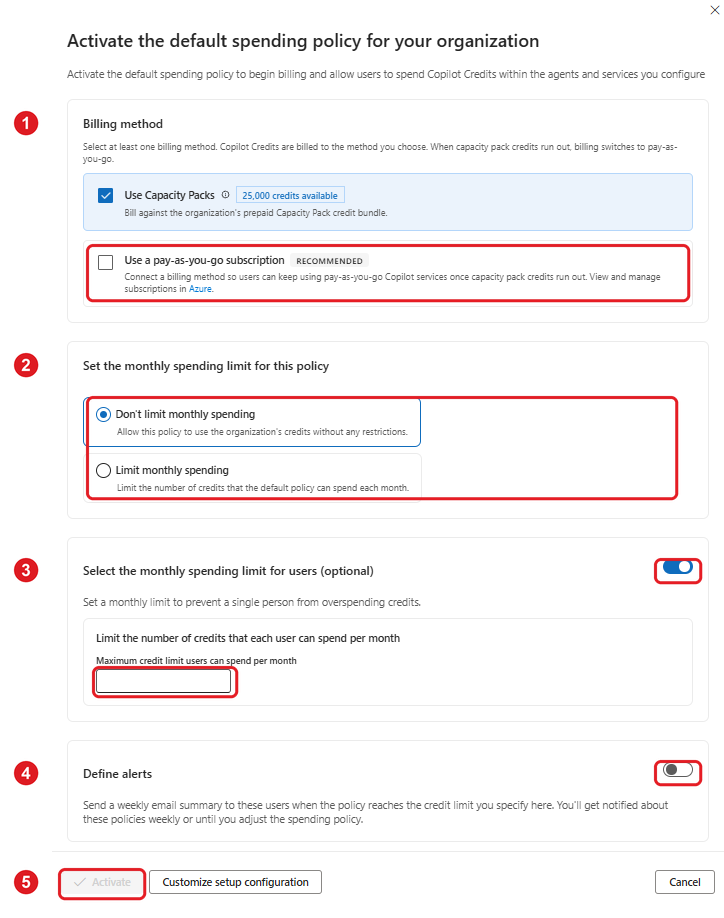
The activation panel: billing method (1), monthly limit (2), per-user limit (3), alerts (4), then Activate (5).
- 7Set limits: the real safety net
This is the step not to skip. Pay-as-you-go is flexible, but without limits, a single person or an unusual month can send the bill off the rails. Two caps to set:
- The overall monthly limit: the maximum credit budget for the whole scope of the policy.
- The per-user limit: the maximum one individual can consume in a month. Officially optional, but strongly recommended to stop one person from draining the team's whole budget.
In practice, when a user hits their limit, they lose access to the services until the reset on the 1st of the next month. Add the weekly email alerts and you stay in control without watching a dashboard all day.
- 8Going further: per-team policies
To create a targeted policy, the path is: Copilot›Cost management›Configuration tab›+ Add spending policy. You then choose the scope (a security group), the limits, the allowed services and even a dedicated billing method (handy for departmental billing). Each policy has its own independent limits and doesn't inherit the tenant cap.
The summary card below shows everything a policy contains. The markers point to the key levers: the billing method (marker 1), the monthly cap (marker 2), the per-user and per-group limits (marker 3) and the alerts (marker 4). One glance tells you who can spend what.
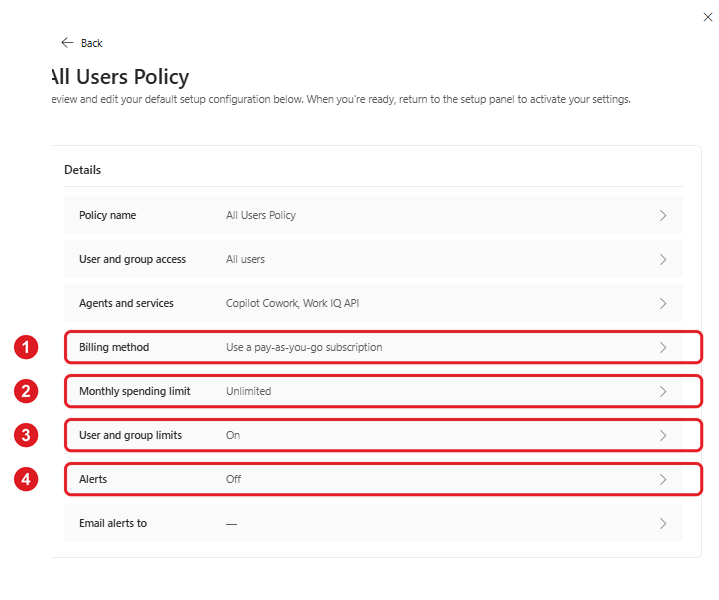
A policy summary card: billing method (1), monthly cap (2), user/group limits (3), alerts (4).
- 9What to remember
The billing policy isn't administrative paperwork: it's the switch that makes Cowork usable, and the safety net that makes it worry-free. Without it, no execution; badly set, no budget control.
The right reflex to start: an Azure subscription on PAYGO, the default policy activated, a per-user limit and email alerts. You measure for a month, then refine per team. Start simple, stay in control, scale on what proves its value.
Required roles: a Global administrator or Billing administrator to set or change the billing method; an AI administrator or License administrator can create policies, set limits and alerts, but can't change the billing method. When several credit sources coexist, the consumption order is: capacity packs, then P3 prepaid credits, then pay-as-you-go. To estimate your credits before you start, use the Customer Cowork Estimator.
📚 Official sources
💬 Comments
No comments yet. Be the first!
✨ Discover more
PremiumCowork: understanding value consumed, not price
Cowork isn't reasoned about like one more license, but like value consumed: you pay for the work actually done. Let's look at the four-building-block framework, how to classify missions (Light, Medium, Heavy) to size a budget, why pay-as-you-go is interesting, and how to spot your best use cases.
PremiumCowork in practice: a multi-task prompt and tracking credits with /cost
You know Cowork, now let's see it in action. An example prompt that chains several tasks at once, the right reflex to choose between Cowork and classic Copilot, and the /cost command to see how many credits your request used.
PremiumUse GPT models in Cowork without enabling Anthropic
Haven't enabled Anthropic for GDPR or governance reasons? Cowork remains fully usable with GPT models. Enable OpenAI as a Microsoft subprocessor to surface GPT 5.5 and GPT 5.6, then let users work with a GPT-centered configuration.